Resident Evil Requiem: how to complete the "Final Riddle" challenge - a step-by-step guide
Resident Evil Requiem has several challenges that cannot be completed by simply progressing through the story. "Final Riddle" is one of the most confusing. The game barely explains the conditions, and solving it fully will require more than one playthrough. We have prepared a detailed step-by-step guide to help you complete the challenge and get the reward.
Final Riddle
The "Final Riddle" challenge is a hidden challenge in Resident Evil Requiem, the conditions of which become clear only after the first playthrough. At the same time, you can begin working toward it during your first run if you know the sequence of actions in advance.
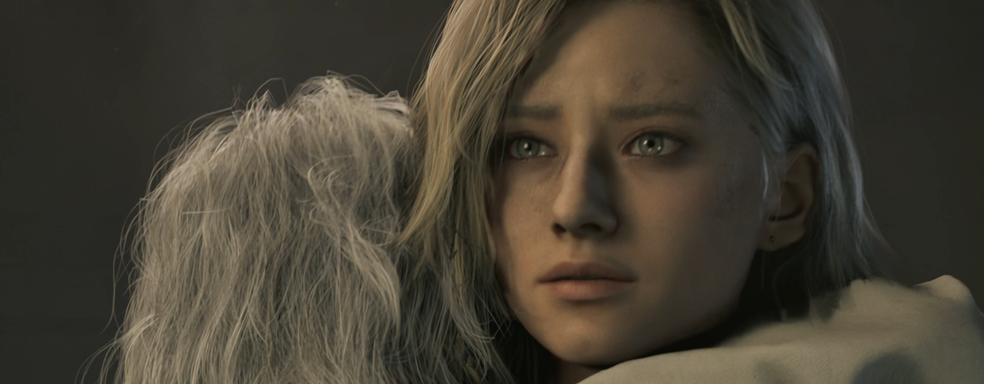
The wording of the condition is extremely vague: "Let the sweet pair hear the voice". However, in reality everything is a bit simpler. It refers to the girl Emily and the doll Marie. The player needs to make it so that they both "hear" the girl's laughter in the chief researcher's office after entering the secret combination.
The main difficulty is that the challenge stretches across two playthroughs. During the first, you need to obtain the Marie doll and finish the game with it in your inventory. Only after that will the item carry over into the next run, where you can fulfill the final condition.
If you want to complete the challenge as quickly as possible, it is better to start a new game or load a save made before Grace ends up in the "Processing" room while exploring the basement of Rhodes Hill Medical Center. This is exactly where the chain of actions begins that will ultimately lead to completing the challenge.
Step 1. Wait for 115 infected to fall in the "Processing" room
In the basement of the Assistance Center, you will need to pass through an area with conveyors carrying bodies. At the end of this section is the "Processing" room. Nearby are a valve for draining blood and a typewriter for saving.
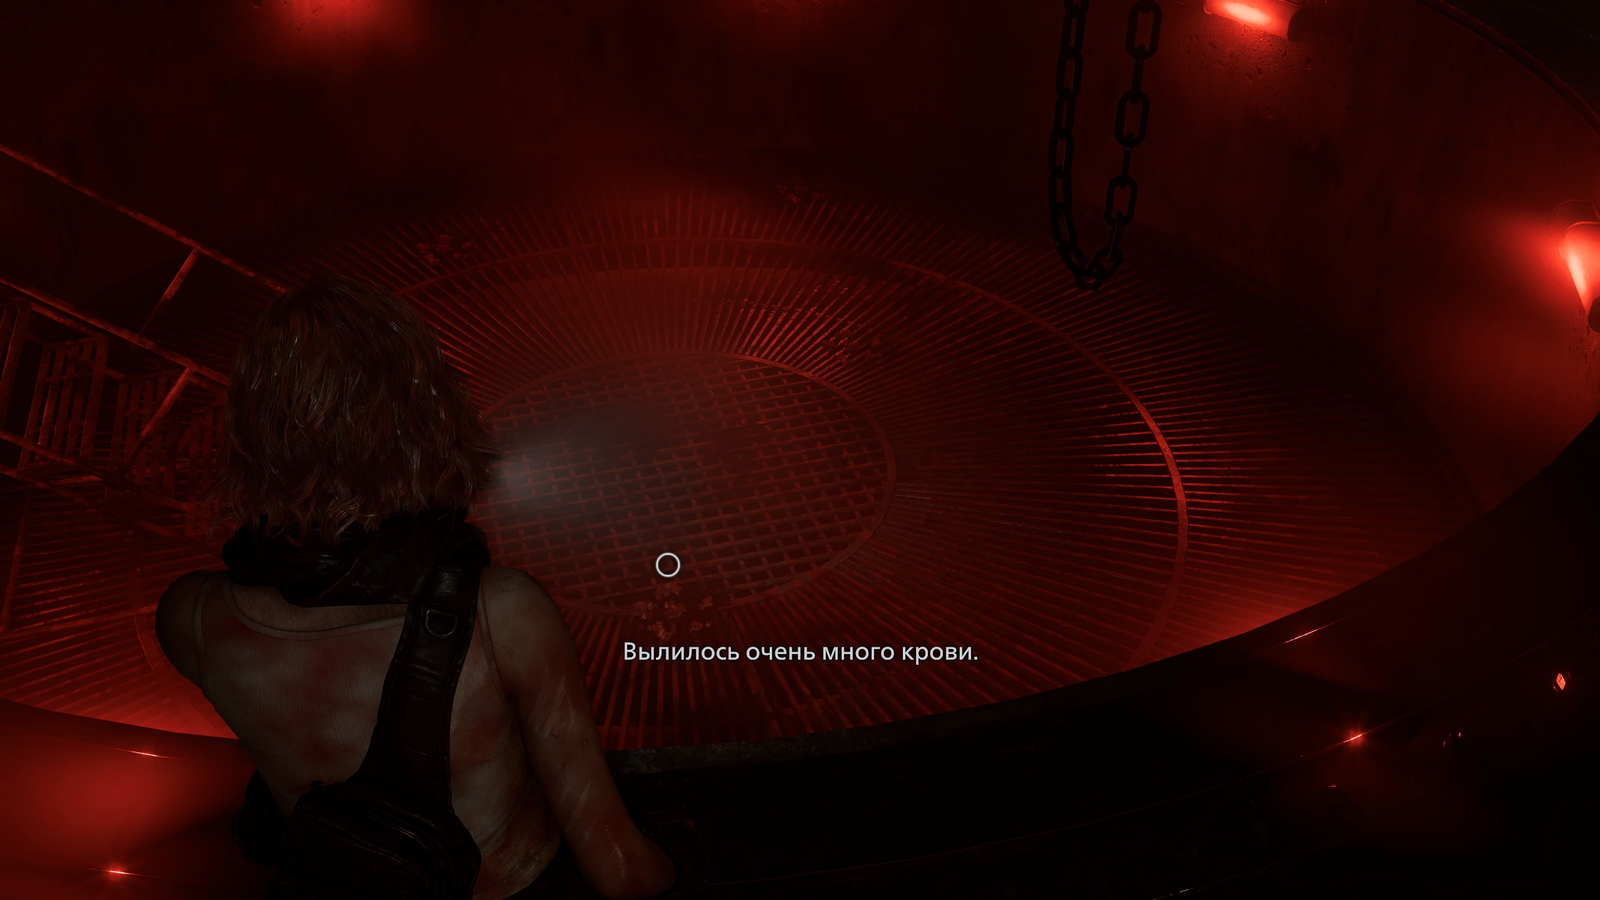
When you enter here, do not touch the valve under any circumstances. It is better to save, then stay in the room and wait until at least 115 infected have fallen into the blood tank.
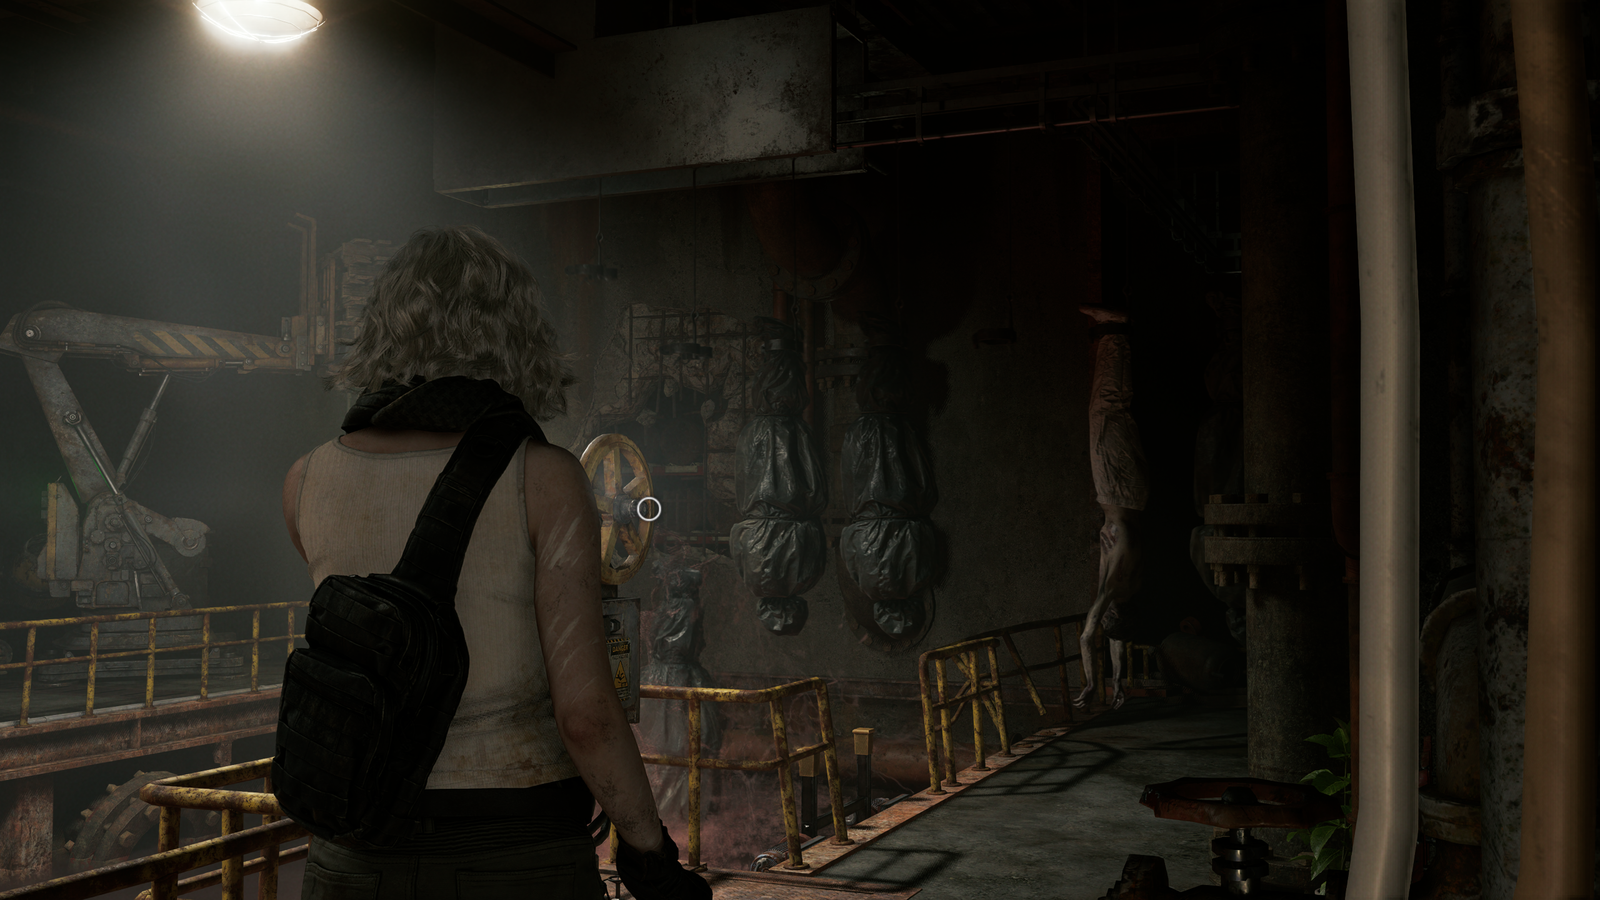
What counts are specifically the zombies hanging on the conveyor — the bodies in bags do not count. To be safe, you can leave Grace waiting for about 15 minutes. During that time, more than enough infected will accumulate. After that, turn the valve and drain the blood.
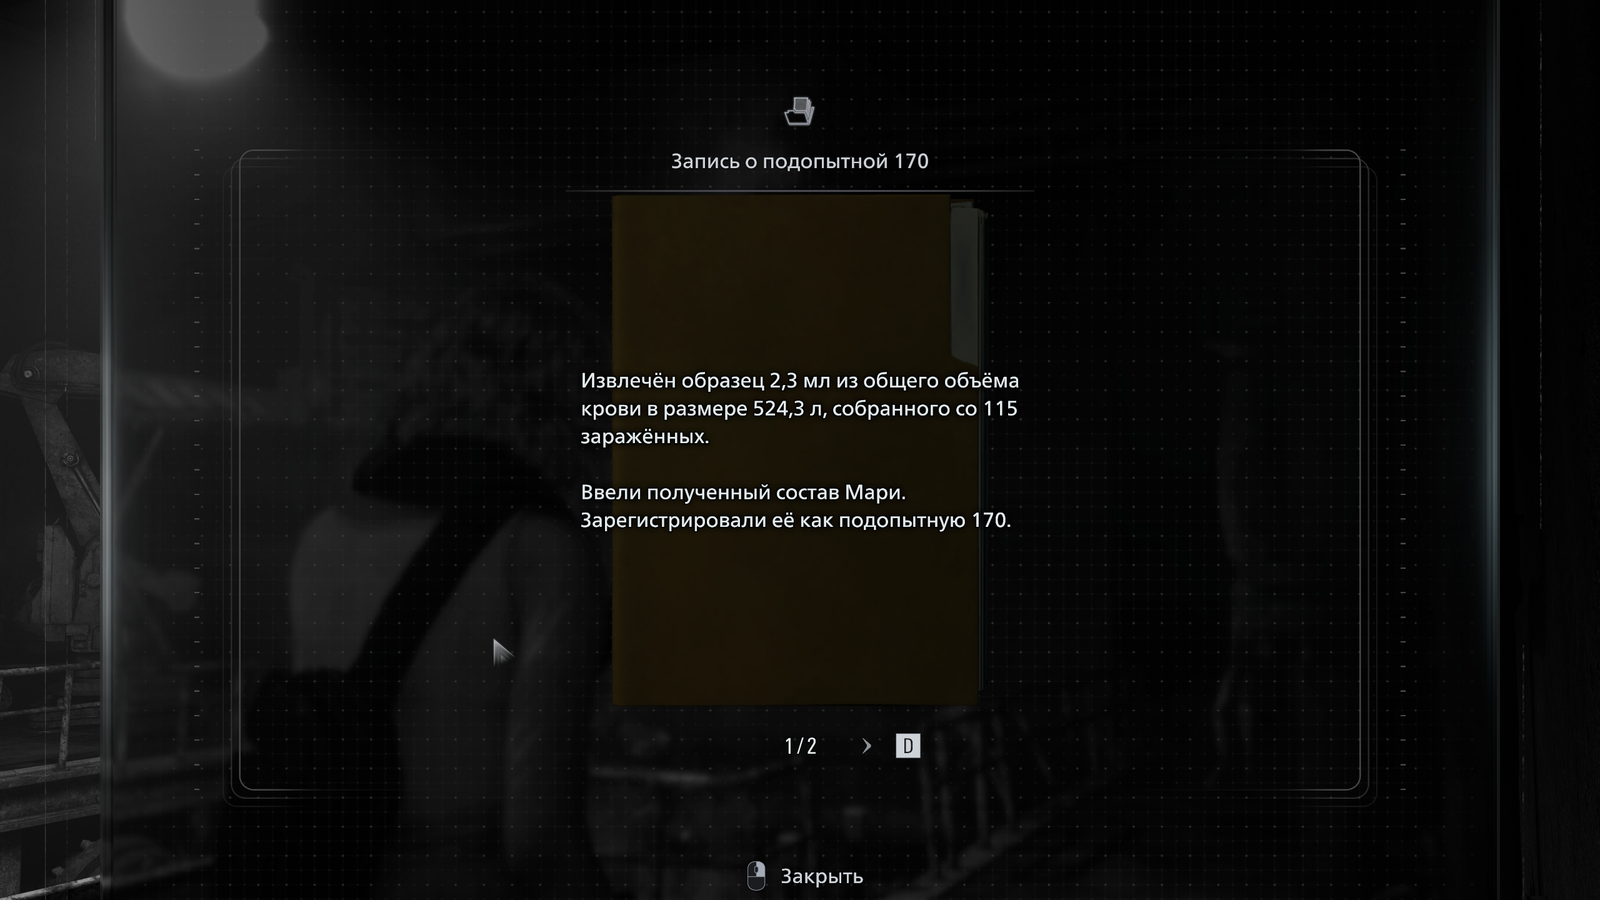
Note: this step is tied to the document "Record of Test Subject 170." That test subject was the runaway girl Marie — the Girl who stalks Grace in the medical center. The record mentions collecting blood from 115 infected.
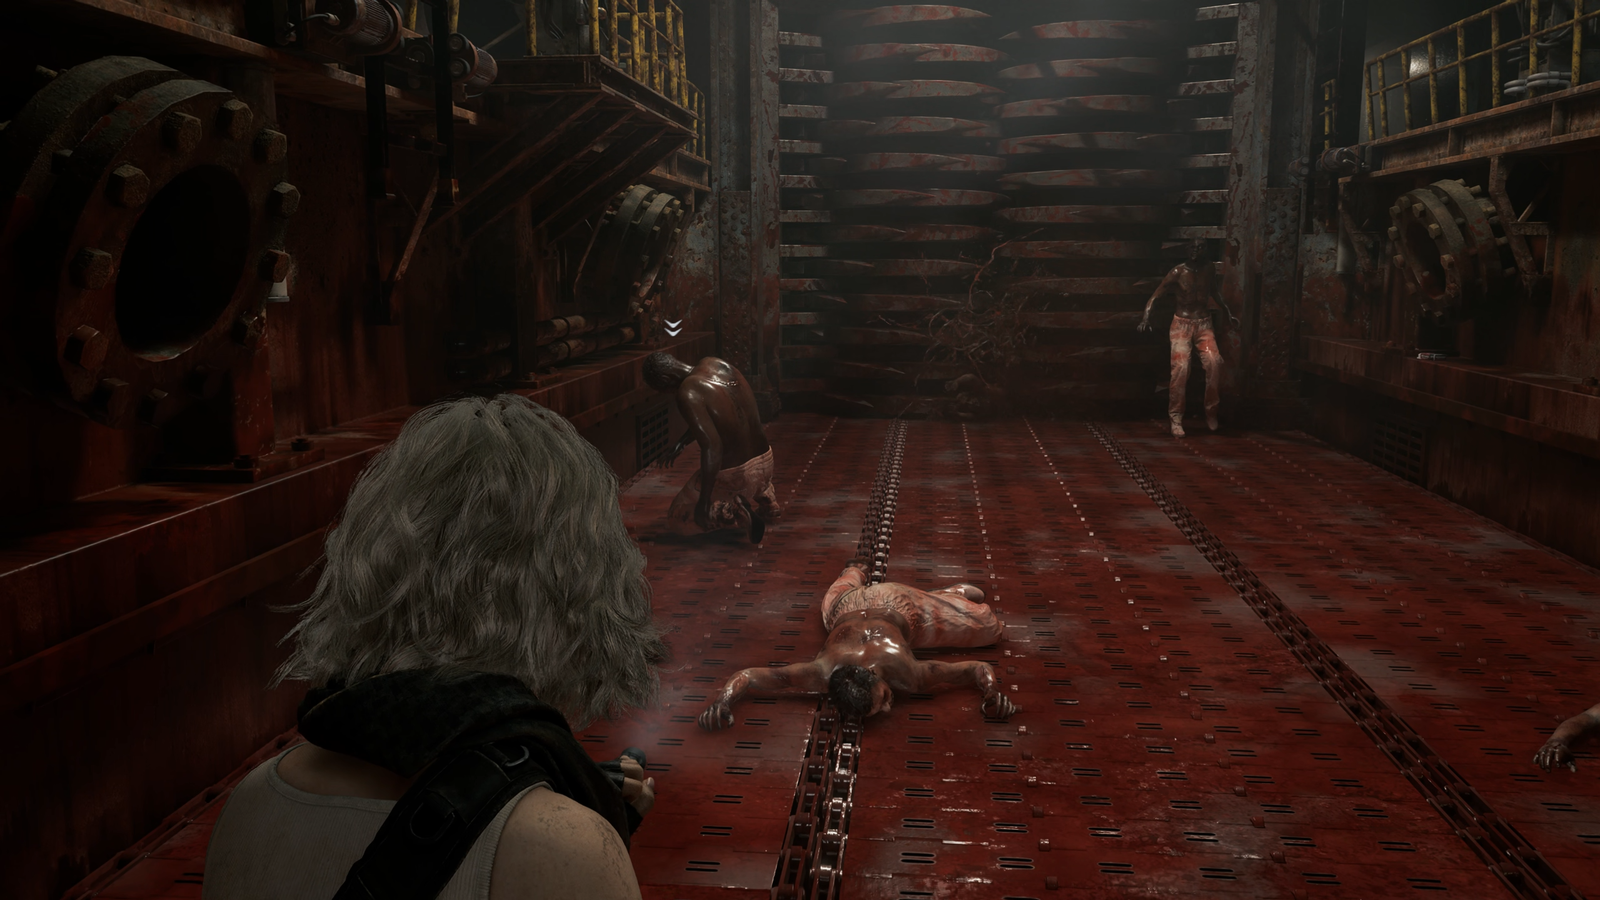
Step 2. Get through "Processing" without killing zombies yourself
After draining the blood, go down the stairs. The processing phase will begin: the conveyor will start, and the zombie bodies will begin to be ground up by the crusher.
An important rule applies here: you must not kill zombies with your own weapons. You need to let the mechanism deal with the enemies on its own.
At the same time, it is important to shoot the risen zombies in the legs to stagger them and push them toward the crusher — this will speed up the process. If you do not do this, several uncrushed zombies may remain at the end of the stage, and then the step will be failed.
If you accidentally killed someone, load your save and try again.
Step 3. How to make sure everything was done correctly
Pick up the third plug. Climb back up to the typewriter and crawl through the ventilation shaft. Grace will slide down into the blood pool. After getting out, activate the switch in the corner labeled "Sample Collection and Testing."
When the blood drains from the tank, a message will appear: "A whole lot of blood spilled out."
If one of the previous steps was done incorrectly, the message will either not appear at all, or it will say: "A lot of blood spilled out."
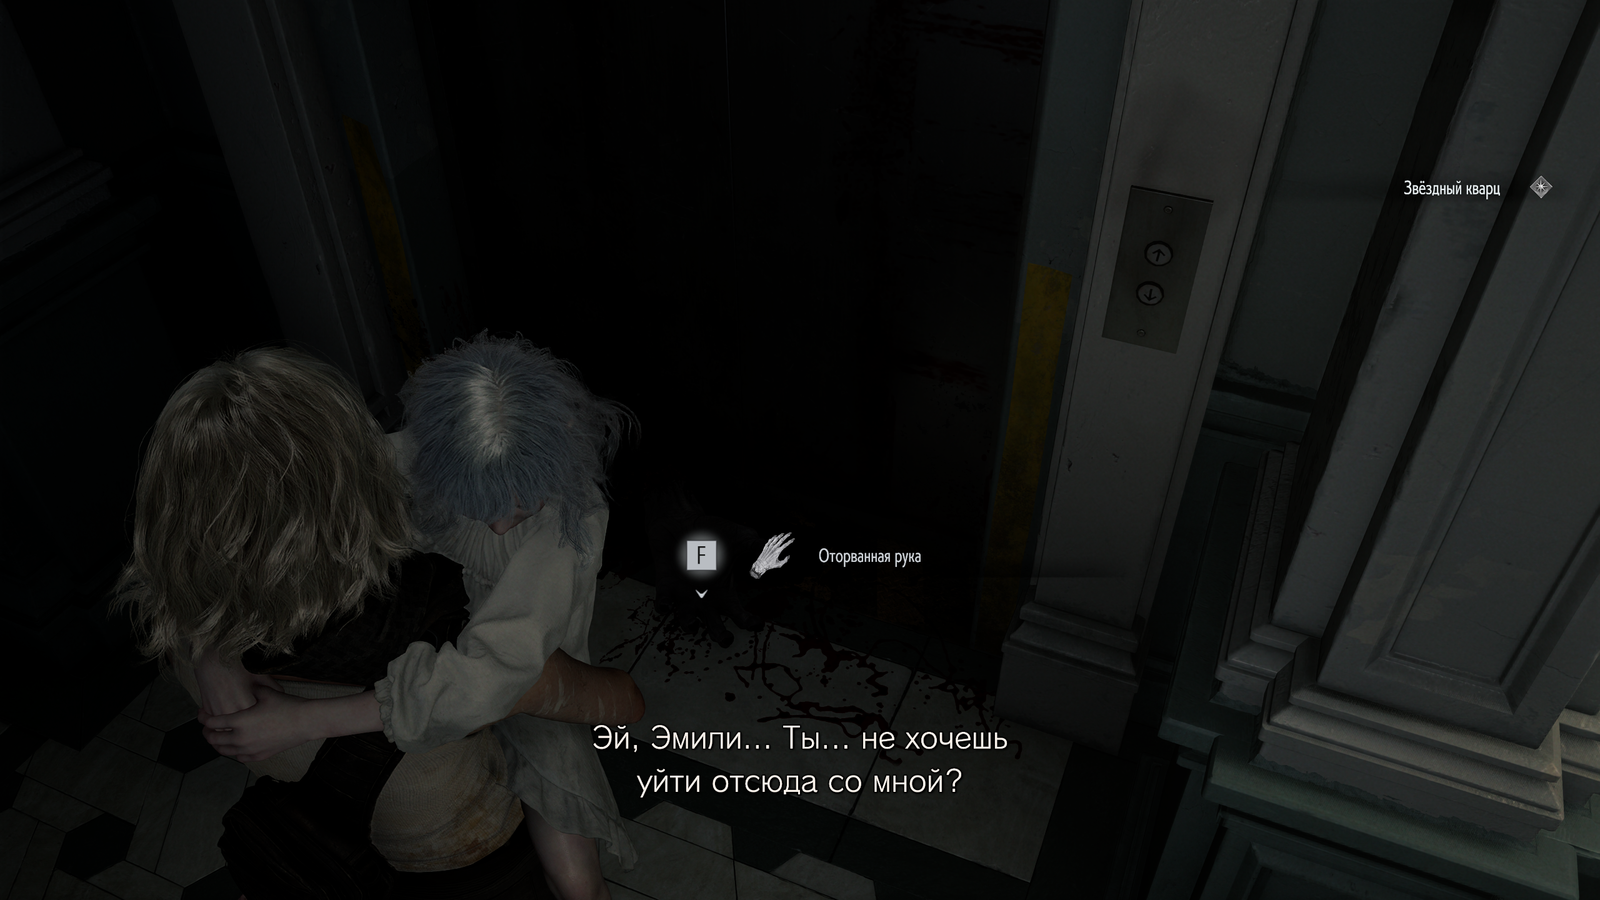
Step 4. Get out of the basement and pick up the "Severed Hand"
Reach the end of the basement segment and pick up the "Severed Hand" near the elevator.
It was previously believed that you could not pick up the hand during the first playthrough, but in fact you can. It is simply not necessary to do so on the first playthrough if you do not plan to decipher the secret code yourself.
Step 5. Flush the toilet eight times
You will not be able to verify this next step immediately, so it is recommended to make a manual save. Leave Emily in the security room and head to the restroom in the western wing of Rhodes Hill. It is located in the corridor between the kitchen and the dining room.
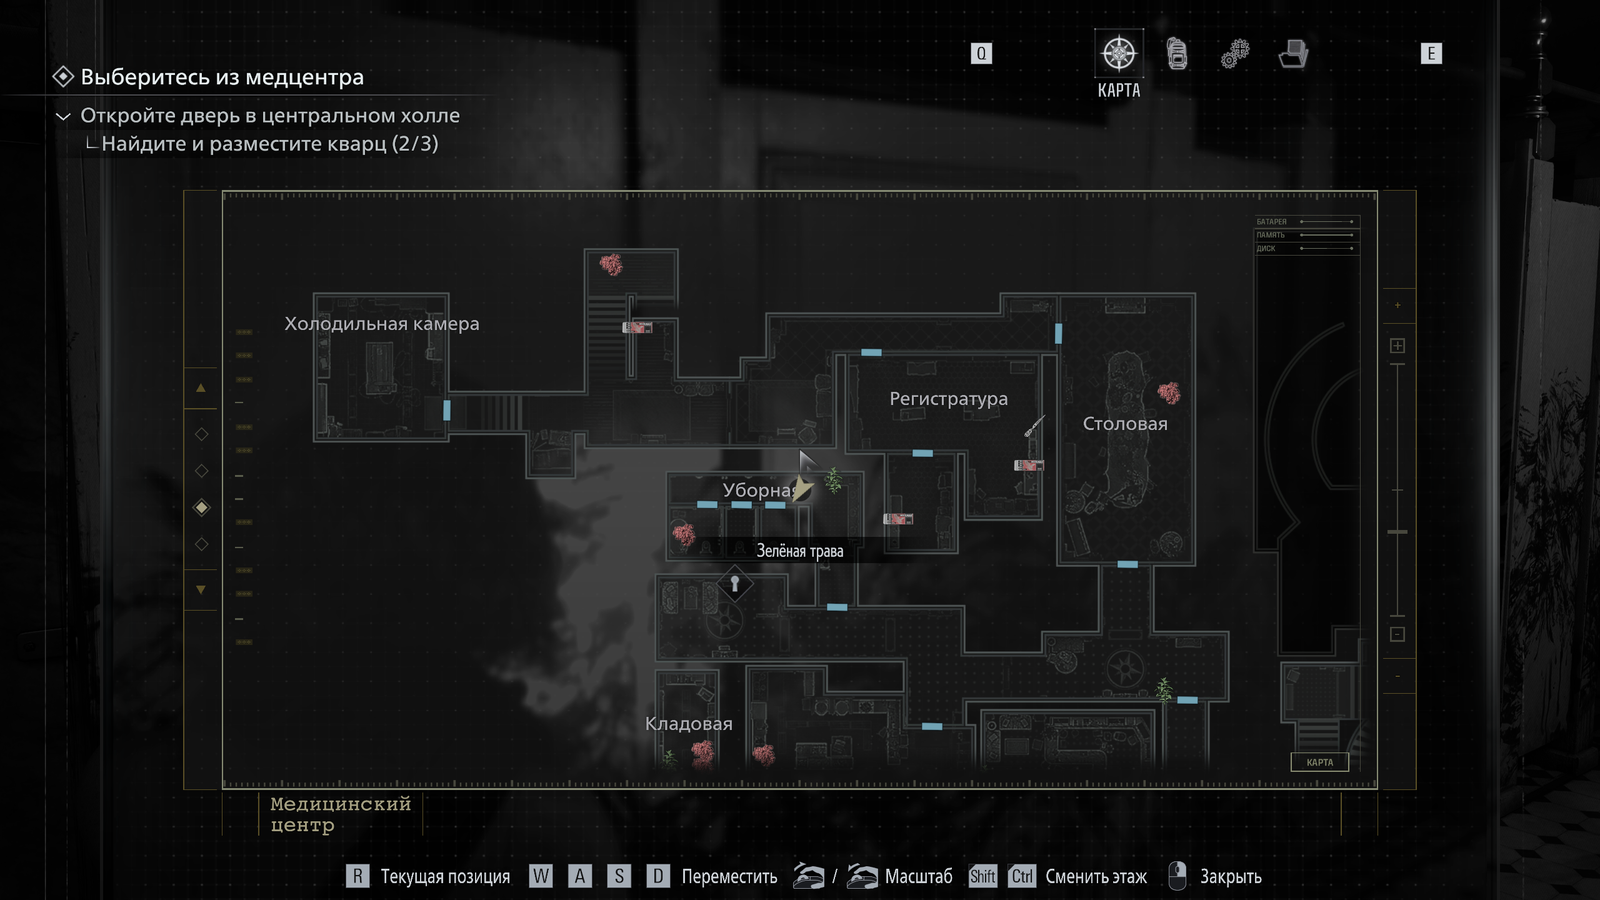
Choose any stall and flush it exactly eight times.
Important:
- use only one toilet
- do it eight times in a row
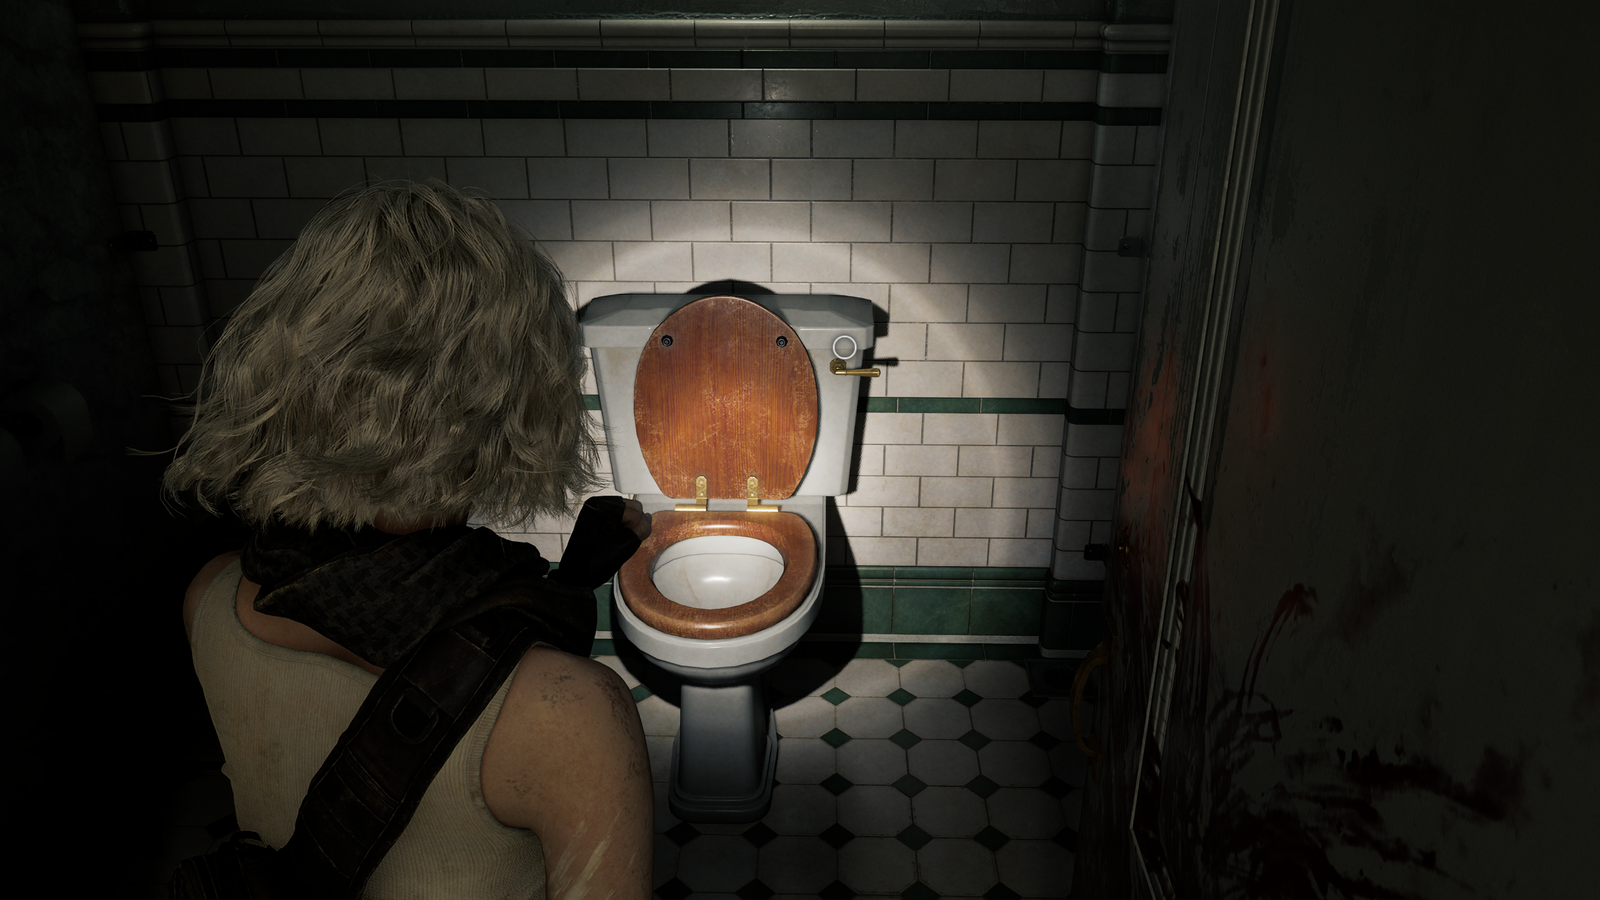
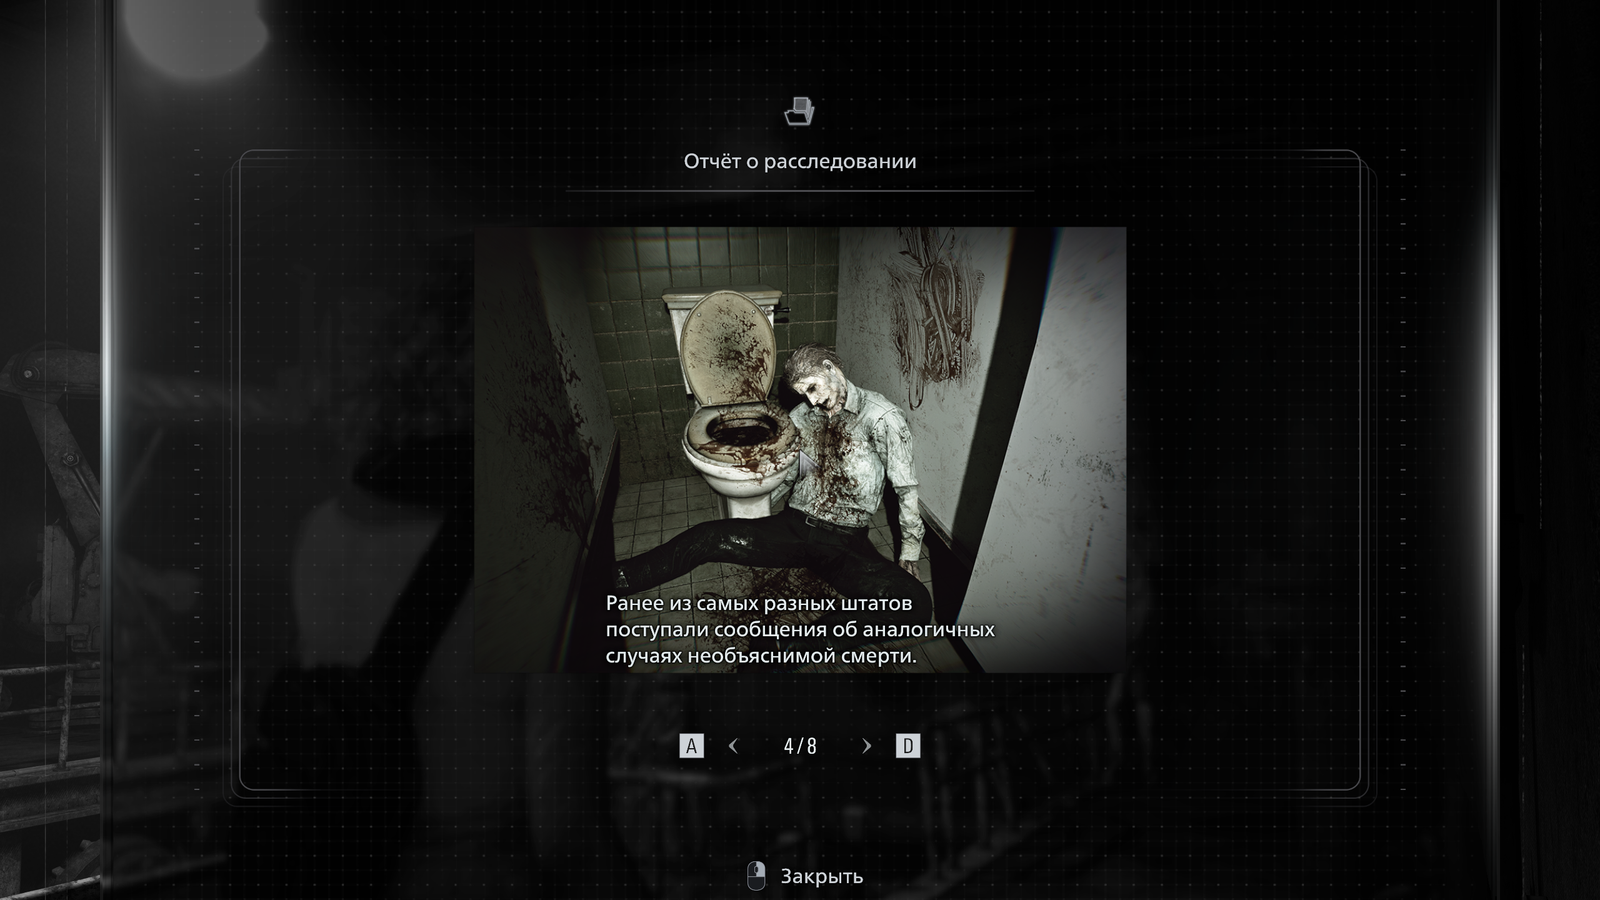
Note: the meaning of this step is connected to one of the photographs in Grace's investigation materials. In the picture, next to the body in the toilet, you can see the number 8 written in blood.
Step 6. Take the "Severed Hand" to the laser microscope
The "Severed Hand" must be taken to the laser microscope in the hematology laboratory in the eastern wing, and the puzzle must be solved.
Sequence of actions:
- activate the left neutral cube
- activate the right neutral cube
- activate the central neutral cube
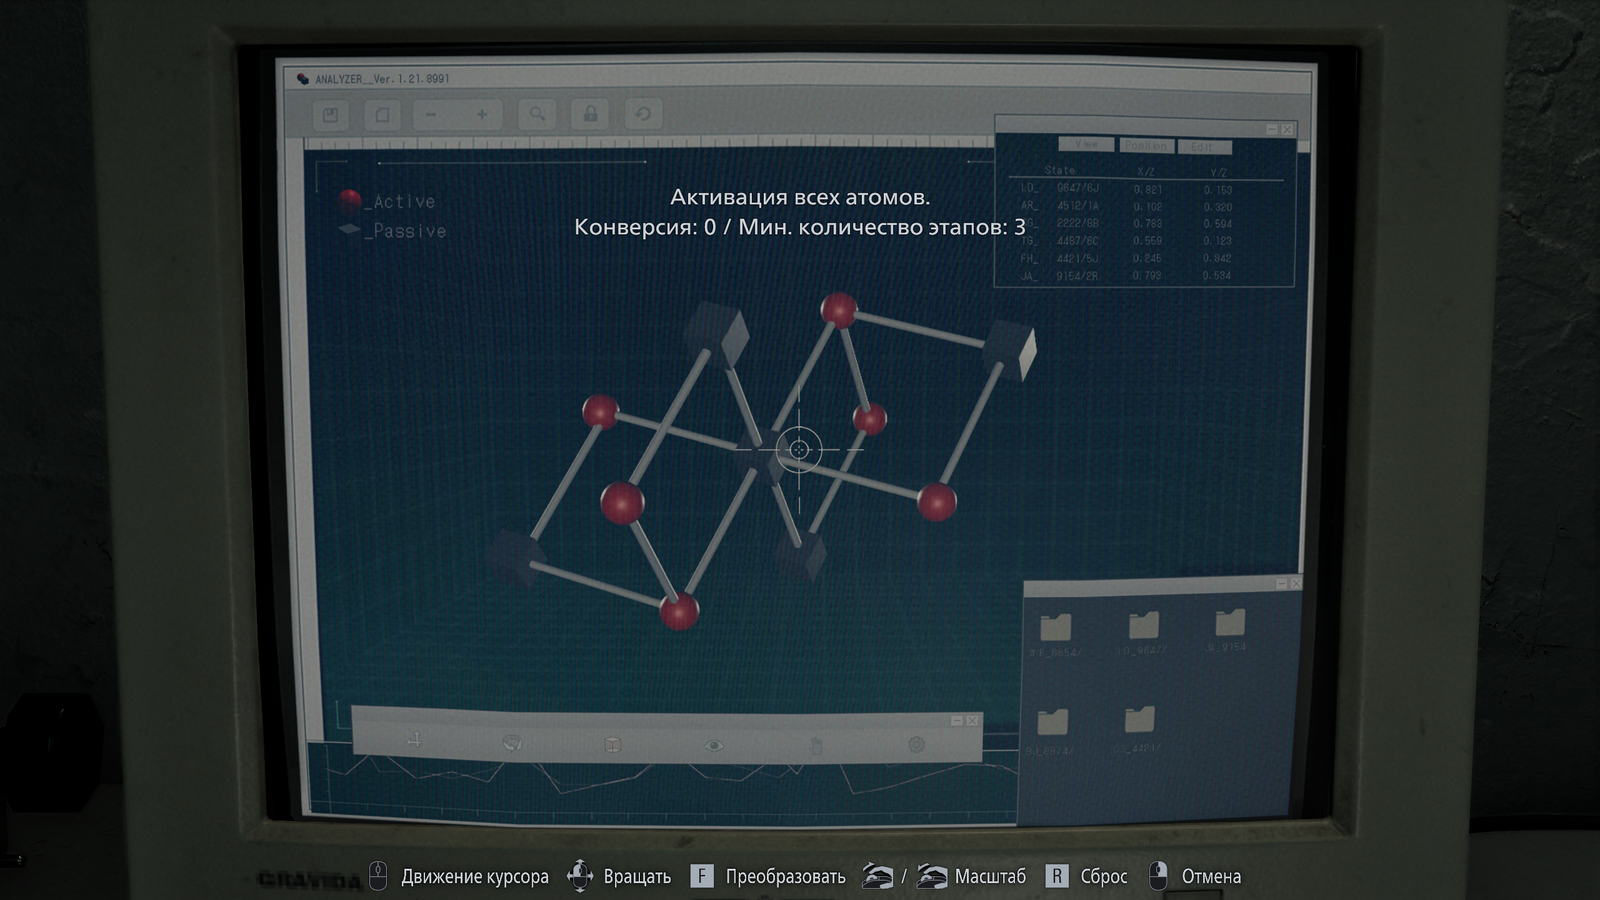
The screen will display the words "Let's Play" and a letter sequence:
GGC AAG AUA ACG UGU CAU
At first glance this looks like a random set of symbols, but in fact these are codons from the genetic code.
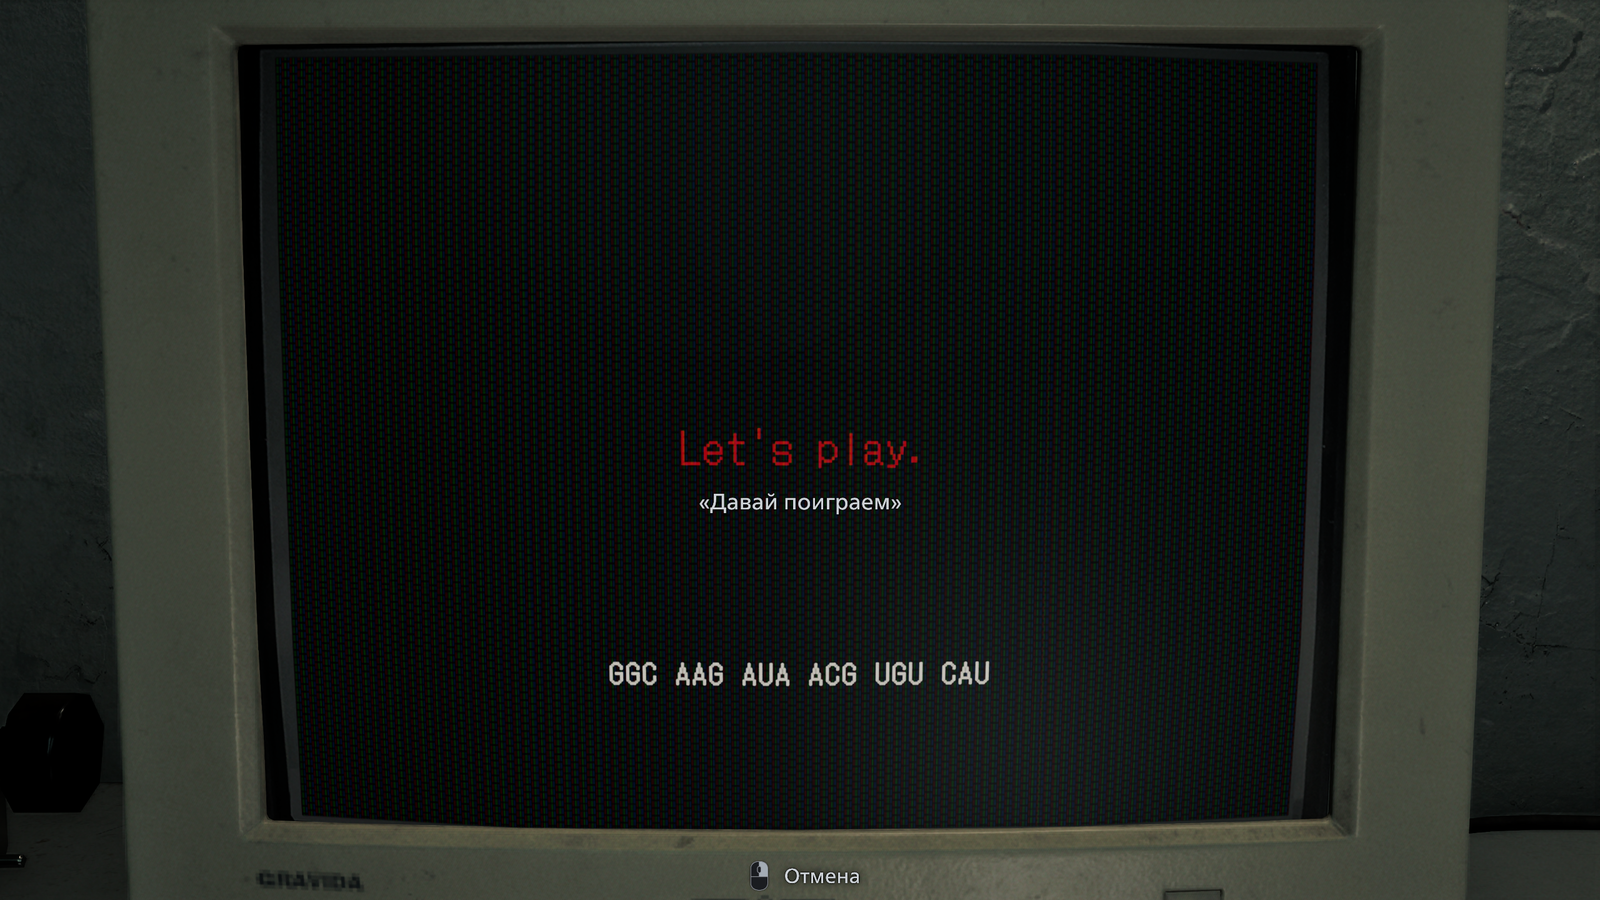
This step can be skipped if you do not want to reproduce the process of finding and deciphering the code.
Step 7. Make a save for the second playthrough
If you do not want to replay the game from the very beginning up to the point where you obtain the "Severed Hand," it is better to make a manual save right now. You will need it for the second playthrough.
Step 8. Find the values of the letters G, U, and C
This step can be skipped if you do not want to decipher the code yourself.
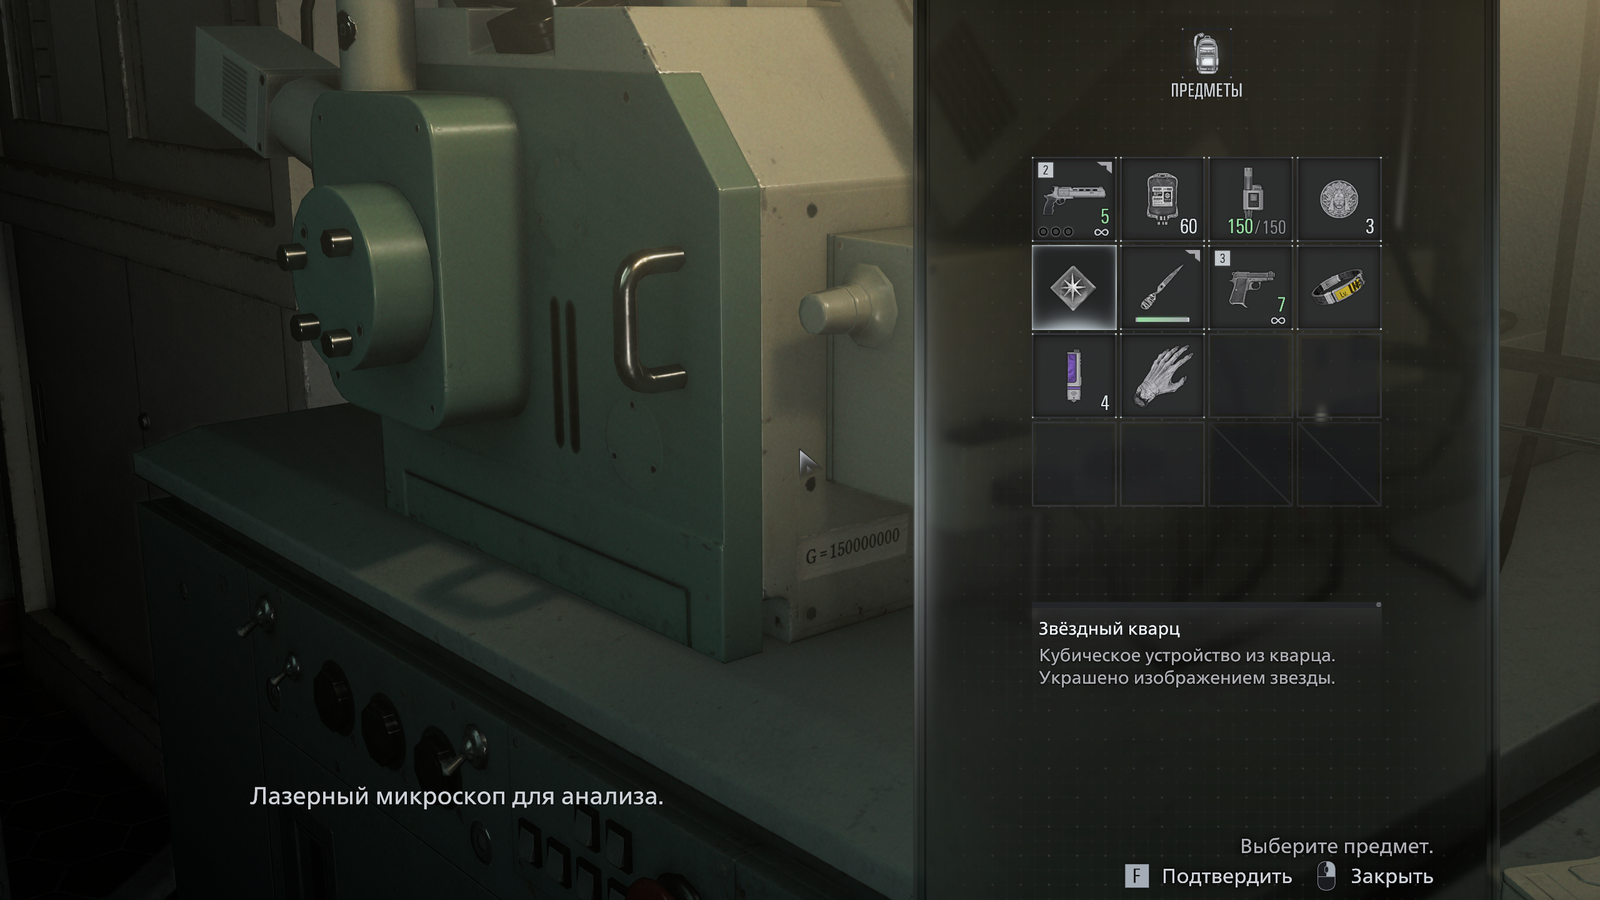
Each letter in the sequence is associated with a specific number indicating an astronomical distance. The clues are scattered across various objects and documents in Rhodes Hill Medical Center and the research complex.
Letter G
Examine the casing of the laser microscope in the hematology laboratory. There is a sticker on it: G = 150000000
150 million kilometers is one astronomical unit, the average distance from the Earth to the Sun.
The value of the letter G is Sun.
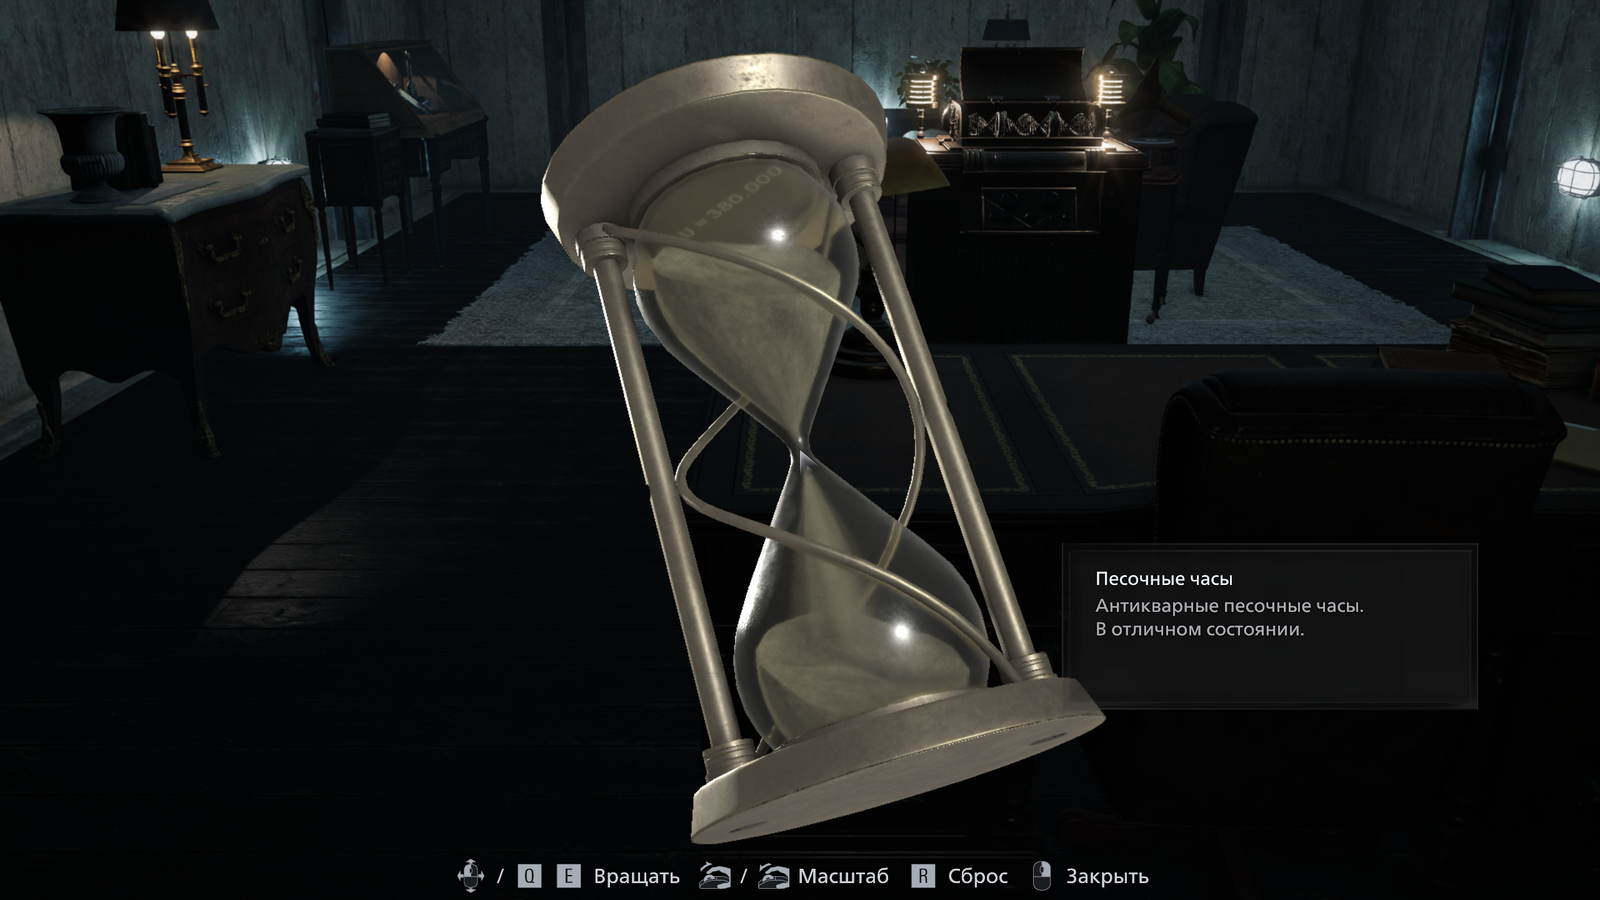
Letter U
The next clue is in the VIP room, which Grace visits while searching for the helicopter keys. Examine the hourglass on the table. If you interact with it and remove the screws, the hourglass can be turned over. When some of the sand falls down, the inscription becomes visible: U = 380000
380 thousand kilometers is the average distance from the Earth to the Moon.
The value of the letter U is Moon.
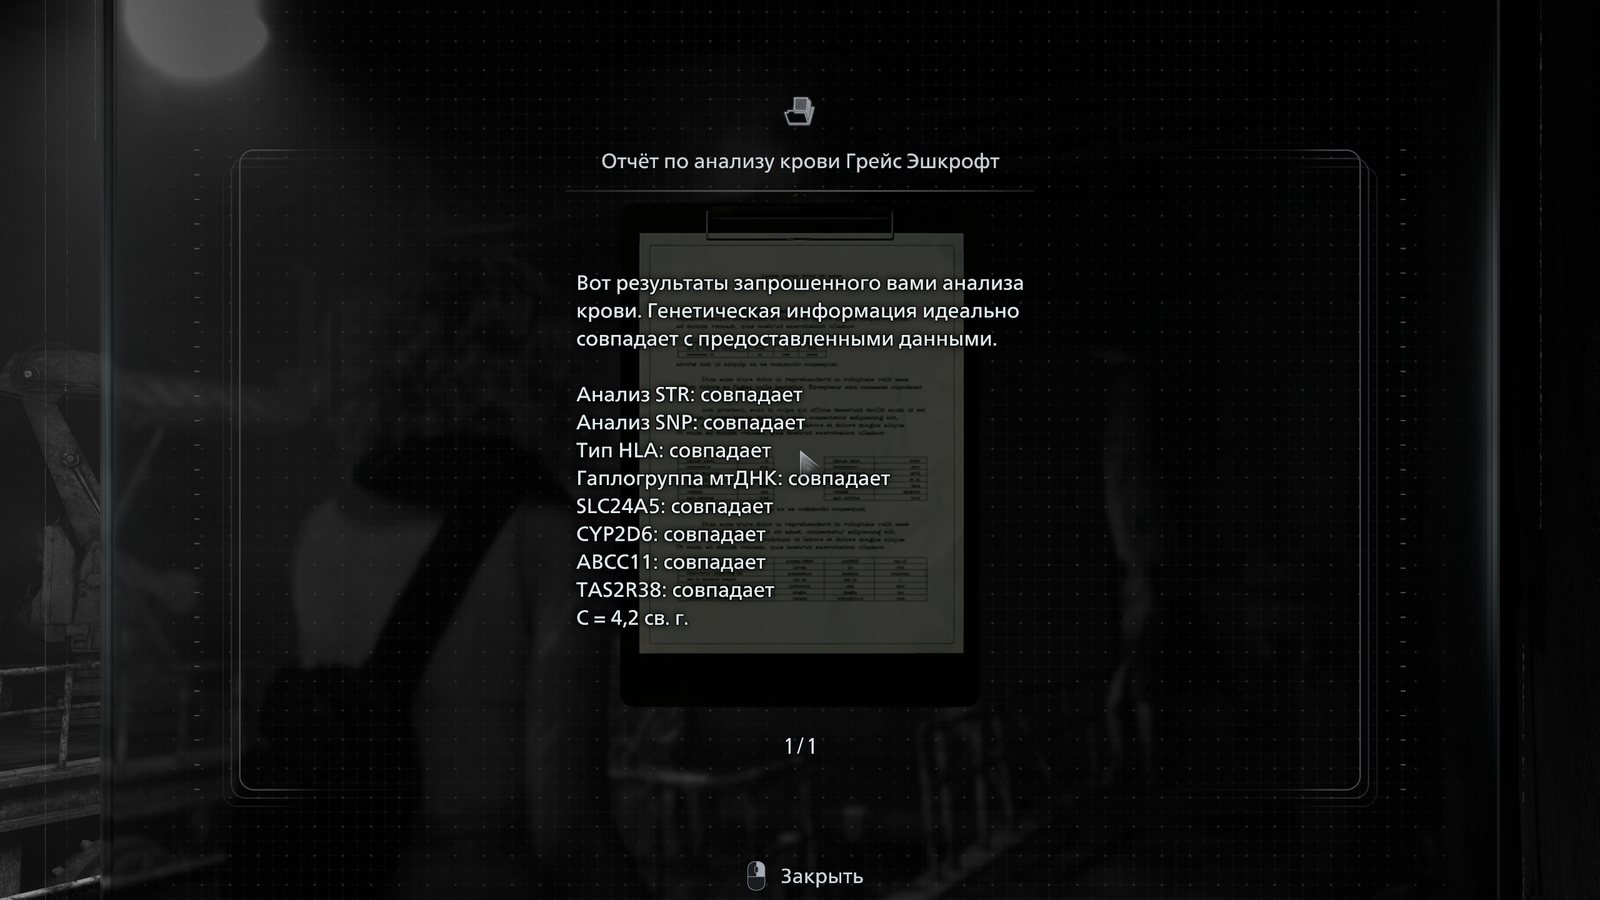
Letter C
The final clue is in the private laboratory of the research complex. On the table lies the document "Grace Ashcroft Blood Analysis Report." The bottom line states: C = 4.2 ly
This is the distance from the Earth to Proxima Centauri.
The value of the letter C is Star.
Step 9. Find the Marie doll
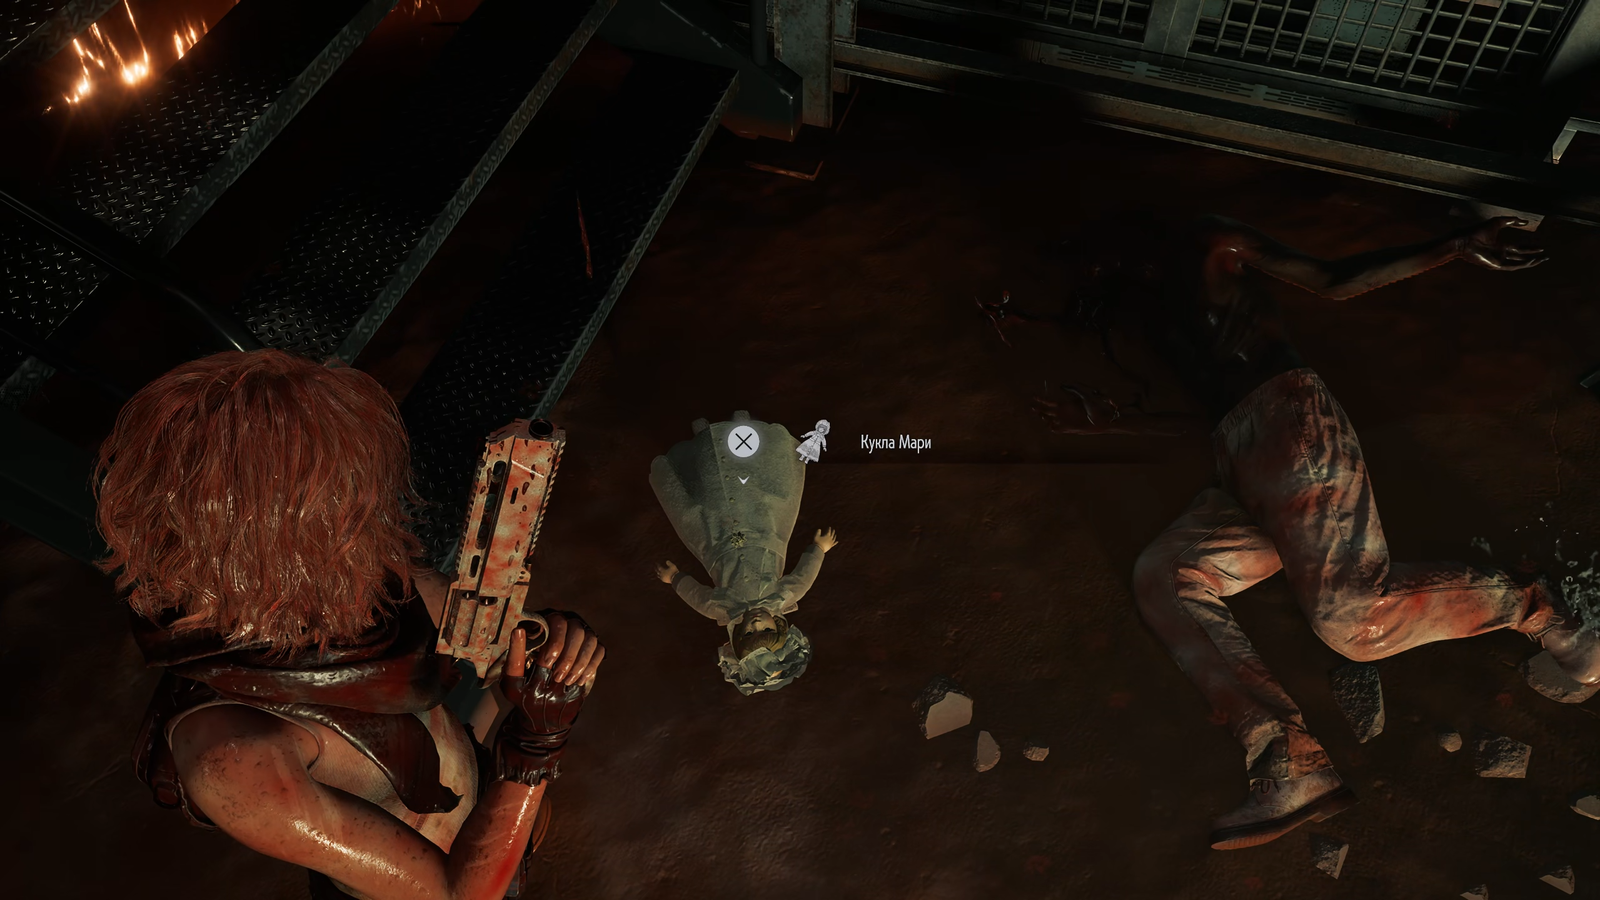
Continue playing until the escape episode from the research complex, after obtaining the helicopter keys. During the evacuation, Grace will end up in a room with a large spherical blood tank. Soon it will burst, and the infected will begin turning into Bubble Heads.
If the previous steps were completed correctly, the Marie doll will be lying near the stairs in this room. It is almost impossible to miss — just follow the evacuation route and watch your step. After picking up the doll, finish the game with it in your inventory.
Step 10. Remove the letter A from the cipher
This step can be skipped if you do not want to decipher the code yourself.
The letter A has no value. You can learn this after Leon defeats the super tyrant on the way to the Raccoon City shelter. After the fight, go to the basketball court on the right. There is a doll head there. Use it as a ball and throw it into the basketball hoop lying on the ground. After that, a shelf will collapse in Kendo's gun shop.
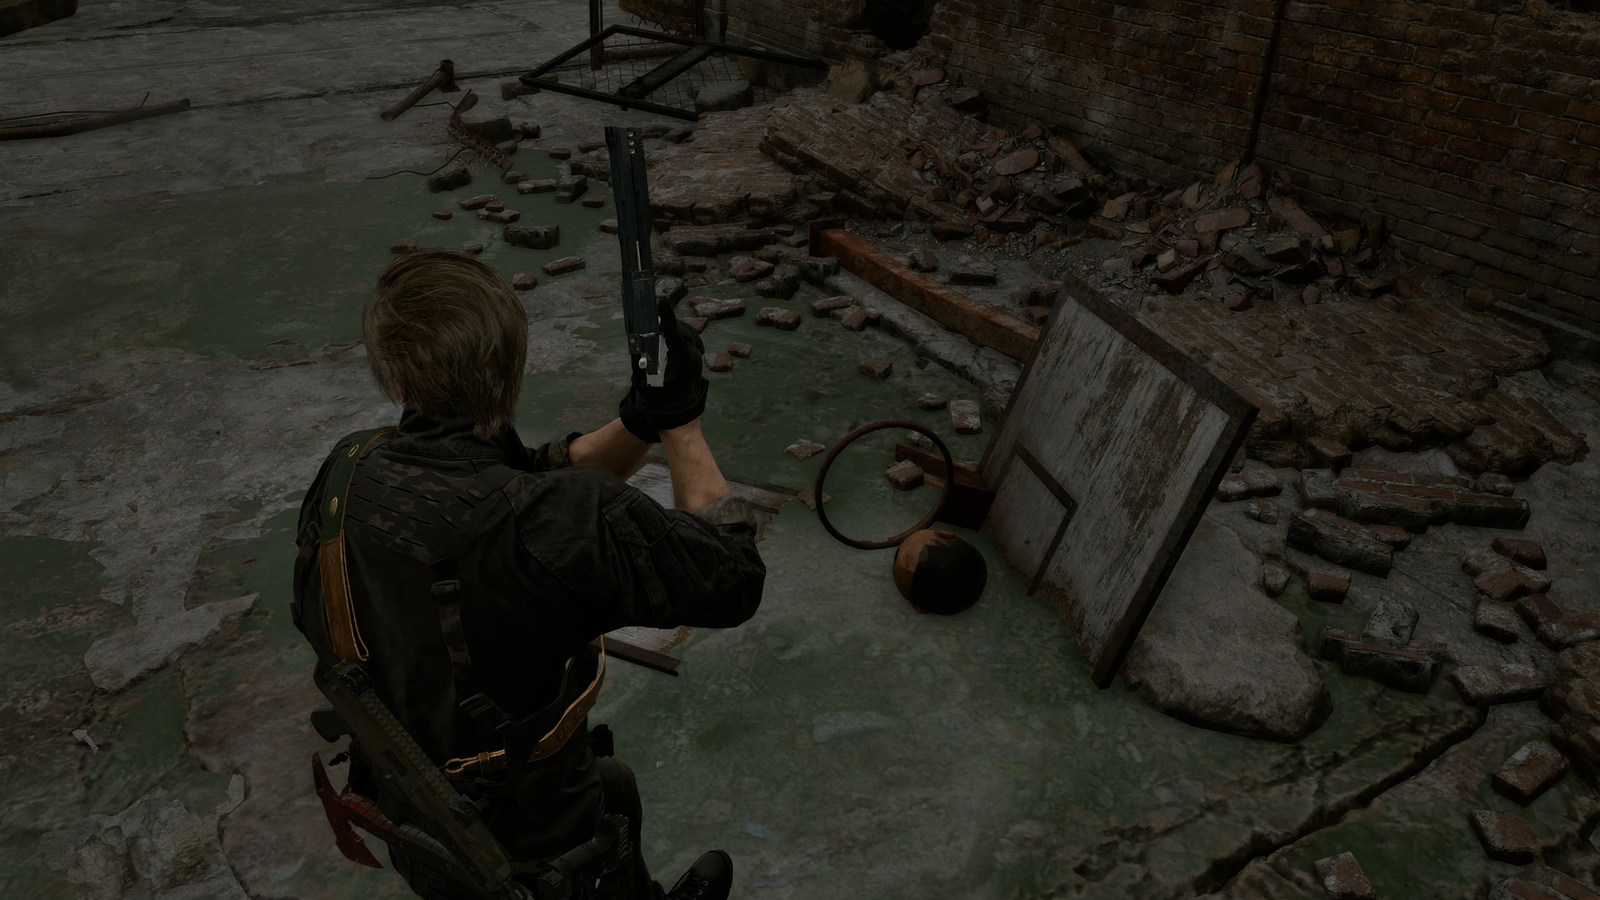
When you return there, you will see the toy's body without a head. Upon interaction, the message will appear: "Ignore A."
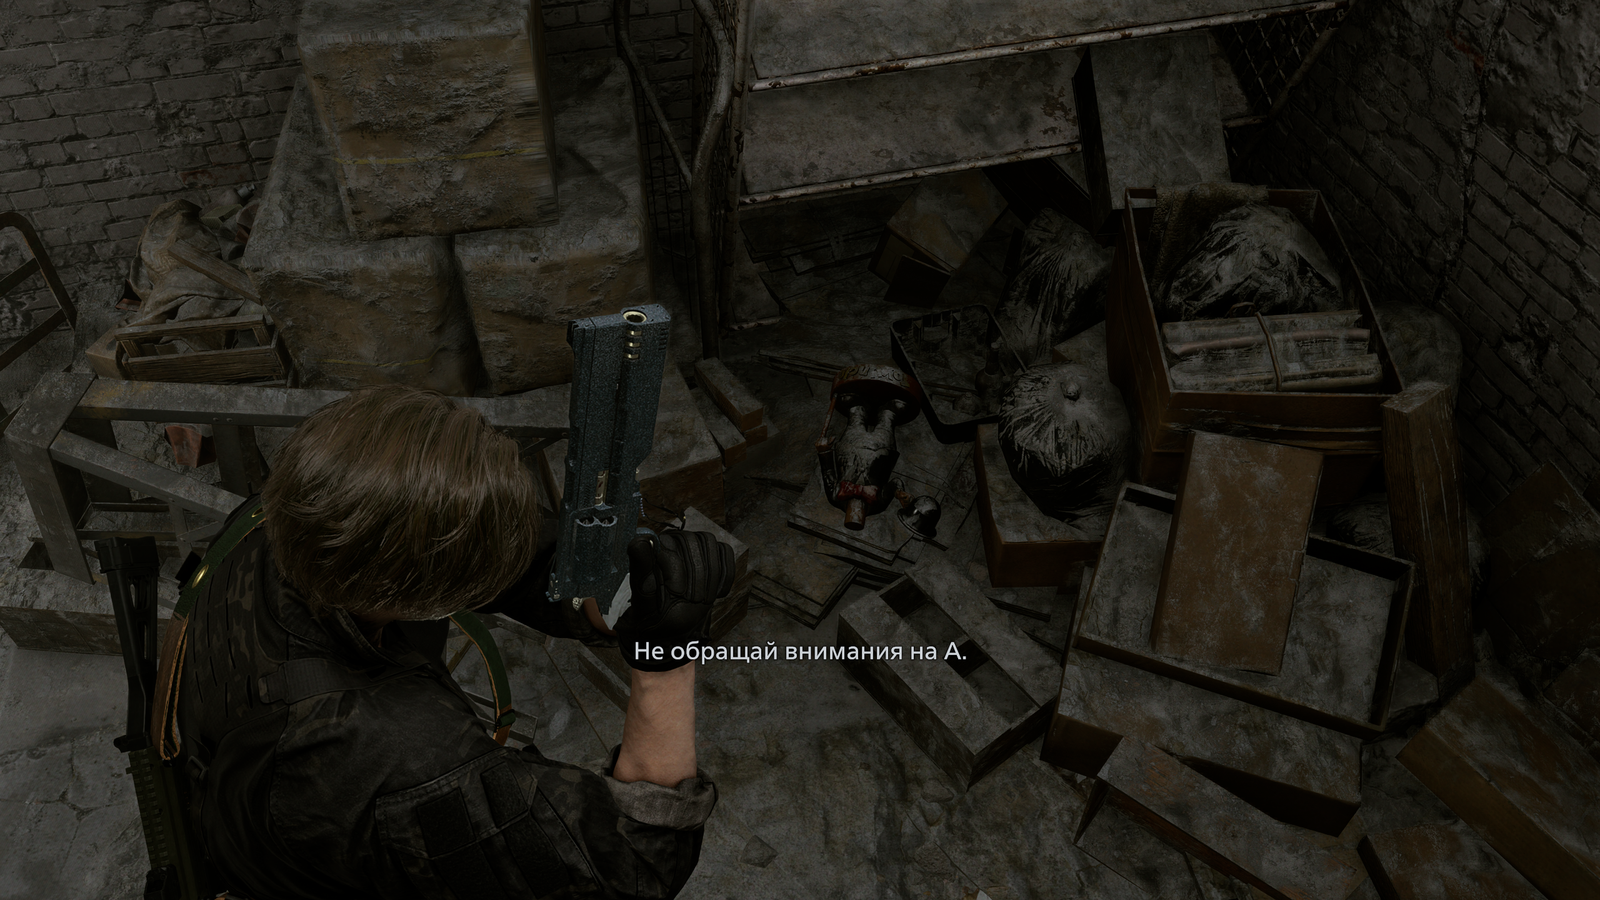
Our cipher looks like this: GGC AAG AUA ACG UGU CAU
If you remove the letter A, you get: GGC G U CG UGU CU
That is: Sun, Sun, Star, Sun, Moon, Star, Sun, Moon, Sun, Moon, Star, Moon
That is the secret combination.
Step 11. Start the second playthrough or load your save
After completing the game, load the save from step 7 or start a new game. Reach the point where Grace gets out of the Rhodes Hill basement and is carrying Emily in her arms. Be sure to pick up and analyze the "Severed Hand" at the laser microscope, otherwise the combination will not work.
Step 12. Challenge finale
You should have: the analyzed "Severed Hand" in your inventory, the Marie doll (it should be in the storage box if you finished the game with it in your inventory), and Emily in your arms.
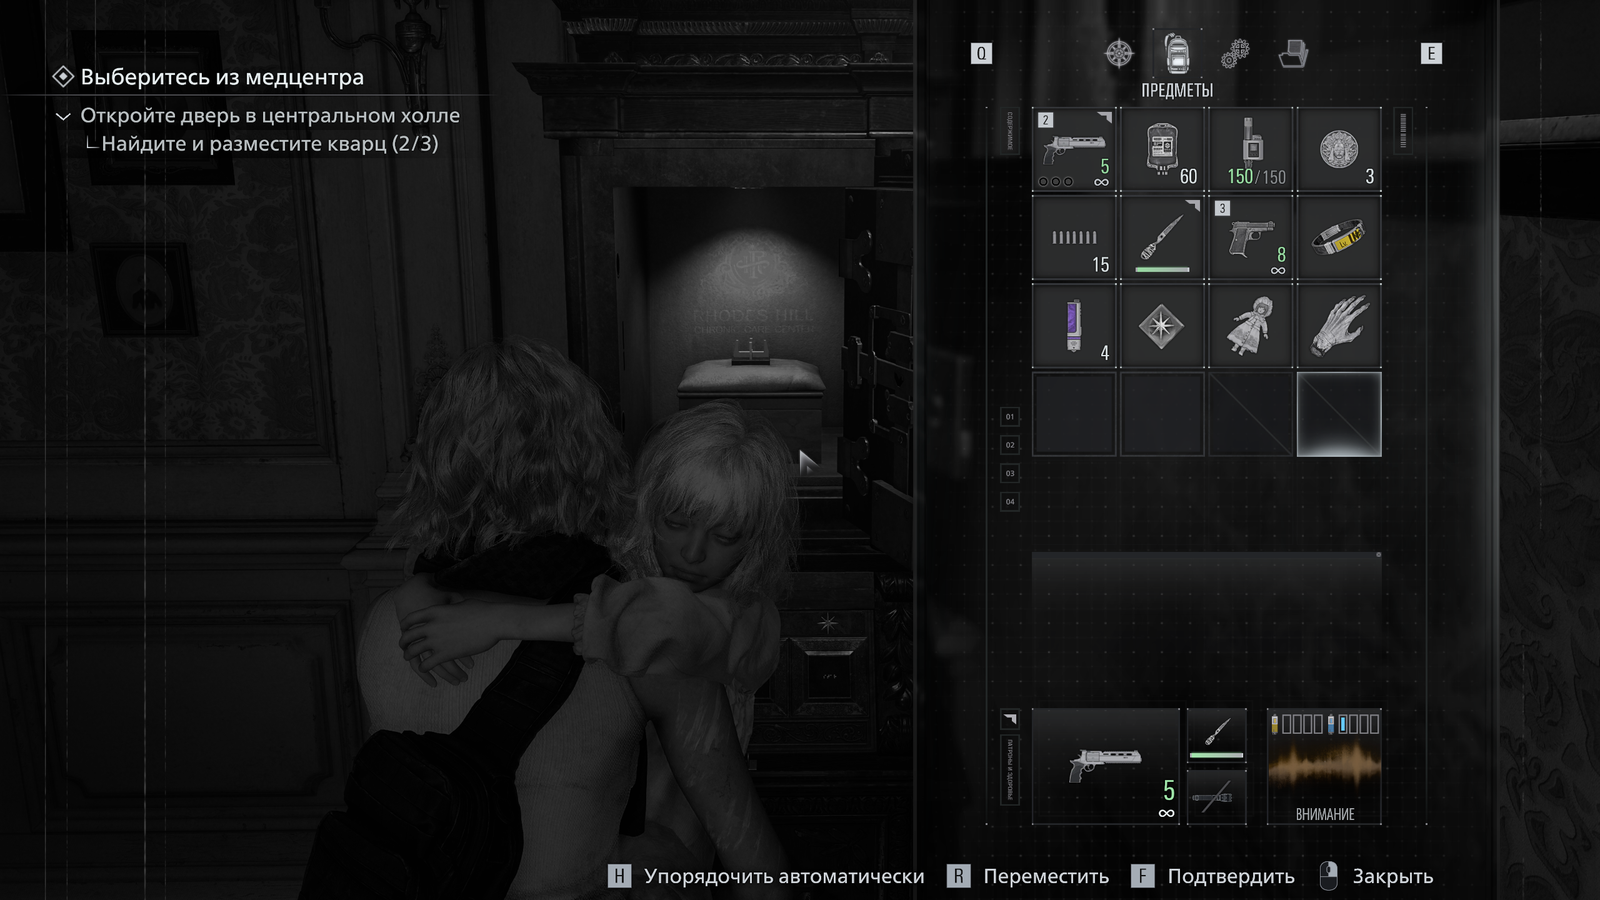
With this set, go to the chief researcher's office on the second floor of the eastern wing and enter the combination on the puzzle safe: Sun, Sun, Star, Sun, Moon, Star, Sun, Moon, Sun, Moon, Star, Moon.
If everything is done correctly, you will hear a child's laughter and complete the challenge. As a reward, you will receive 20,000 points, which can be spent on various bonuses.

Комментарии